Day One with YNAB: How to Set Up Your Budget

So, you’ve figured out that You Need a Budget. Congrats! That’s an essential first step.
Now what?
Seriously. What are you going to do about that?
Oh right, that’s our job.
Well, lucky for you (and for us) this happens to be our area of expertise. You see, we’re not just a budgeting app…we’re also a group of totally normal people who are actually super into budgeting.
And by normal, I mean that we’re a random segment of the general population—we’re not a bunch of bankers or financial advisors or those people who do math for fun; we’re people like you who have all had different experiences, relationships, and yes—struggles with money.
So, we get it! From dealing with debt to stressing about living that paycheck to paycheck life to having no idea how to stick to a budget, that’s all normal! Let’s get started on your new normal by teaching you how to set up your budget in YNAB. It’s a lot more peaceful over here, trust us.
How to Set Up Your Budget in YNAB
If you’d prefer to watch a video, you can watch Creating Your Budget. If you’d like to mix and match your learning experience, click the subheadings of any section in this post to watch the corresponding section of the video. Isn’t that handy?
What You Need to Get Started
Streamline the setup process by gathering up what you’ll need before you sit down to start. Here’s your list of ingredients:
- Access to your bank and credit card accounts and log-in information
- Recent bank statement to reference your monthly bills (amounts and due dates)
- Non-monthly bills with due dates (car registration, insurance payments, annual subscriptions, taxes, etc.)
- Estimate of miscellaneous expenses like gifts for holidays and birthdays (it’s ok to guess! When in doubt, aim high!)
Create Your Plan with Categories and Targets
Now we’re getting into the fun stuff.
(What?? This is fun for us.)
You’re going to create categories for each of your expenses, and set a spending or savings target for every category. A target is how much money you plan to dedicate that expense. You’ll decide how much you want to set aside for groceries or vacation and YNAB will help you visualize and prioritize those goals.
How to Set Spending and Savings Targets
To set a target on mobile, hit the edit pencil at the top of the screen. If you’re using the web app, you’ll click on a category to access the target screens.
Choose Weekly, Monthly, Yearly, or Custom depending on the type of expense—for instance, groceries might be a weekly target in your budget. Input how much you intend to spend each week, and set a day of the week as your due date. With weekly goals, YNAB will multiply the assigned amount by the number of weeks in the month to automatically calculate a monthly total.
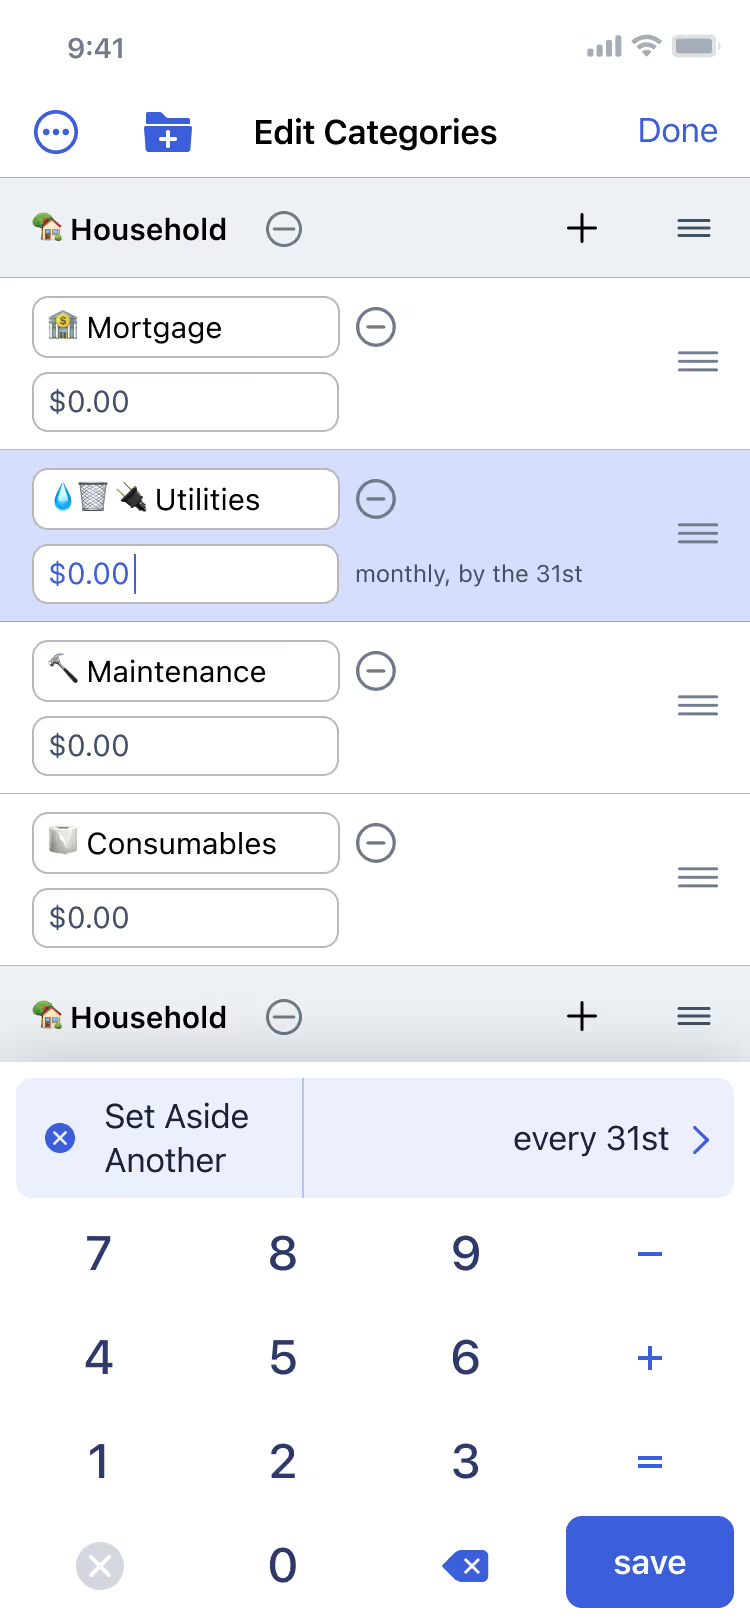
Rent would be a monthly expense, and something like a vacation might be set based on your desired departure date.
Non-monthly expenses would include things like annual subscriptions, such as your car registration. To set up a custom target, enter the amount needed, the date it’s due, and how often the expense repeats. This encourages you to set smaller amounts of money aside regularly so that you’ll have the money when you need it, without it throwing the rest of your monthly budget out of whack.
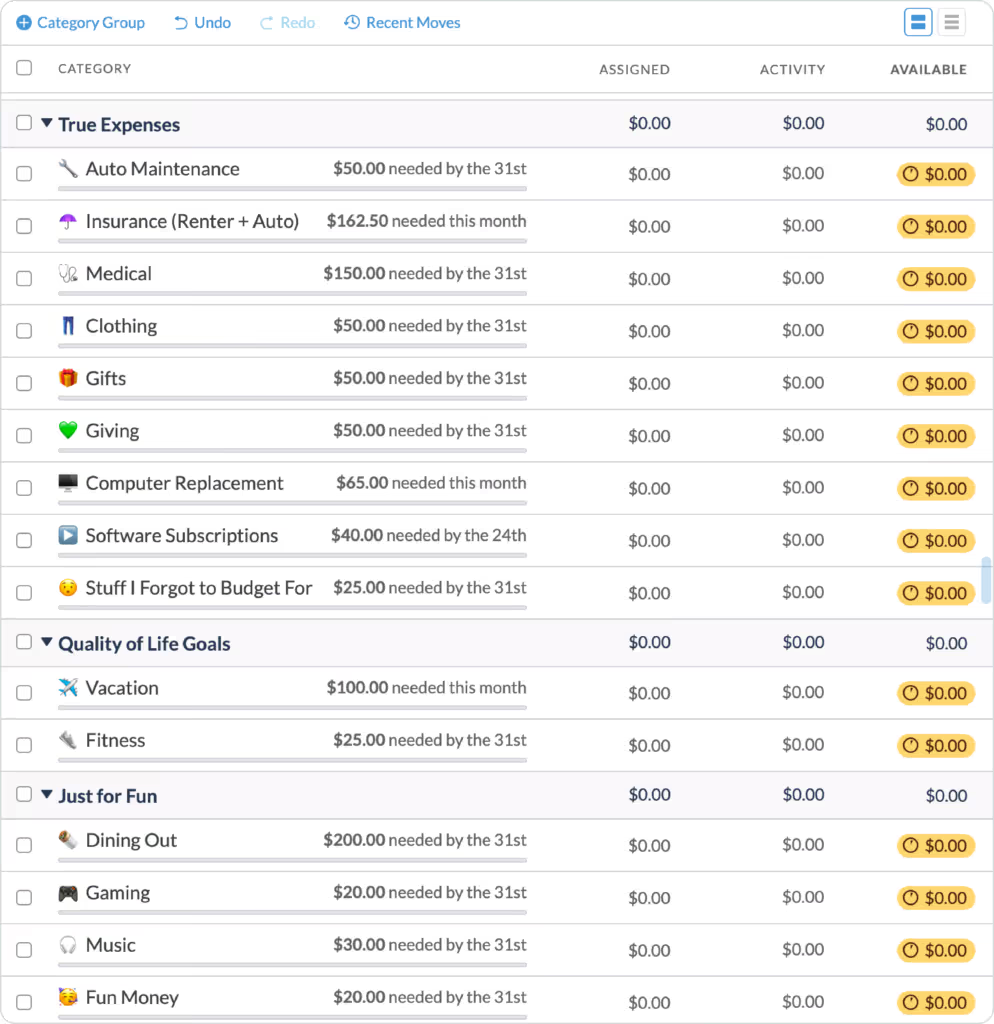
Helpful hint: start simple, with fewer categories, so you don’t feel overwhelmed…you can always add more later!
How to Edit, Organize, and Delete Categories
Thinking, “Uh-oh, I went category crazy and all hope is lost” now? Keep reading.
To delete categories on mobile, just head back to the edit screen where you can either rename the category to something else entirely or just hit the minus sign next to the category name to hide or delete it. On the web app, click the category name to access the hide or delete options.
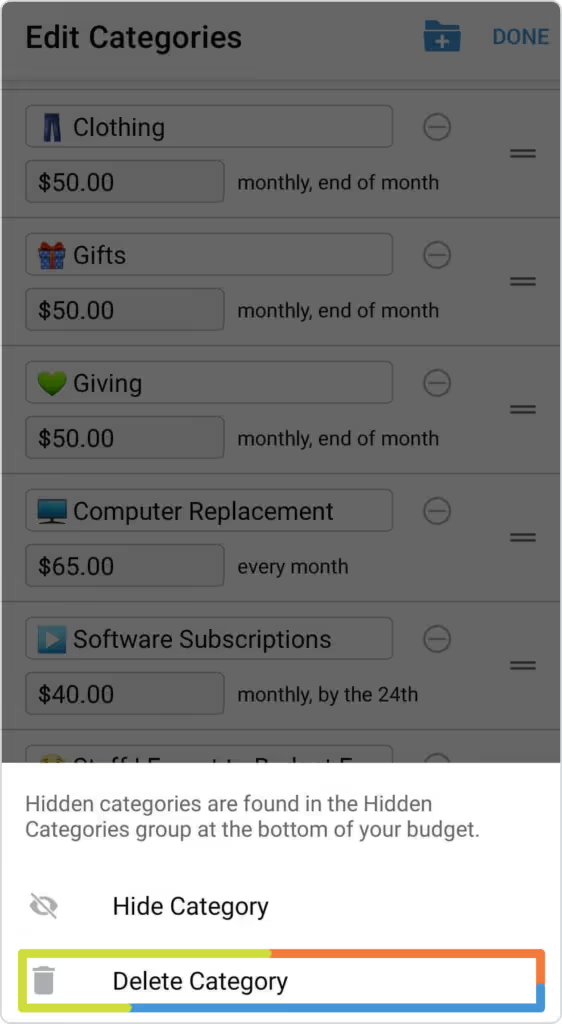
If you’d like to organize your categories by due date, you can drag and drop each line into whatever order you prefer on the web app.
On the mobile app, just head back to the edit screen and press and hold the three lines on the right to drag and drop your categories.
How to Think About Your Budget
So you’ve set up a plan…now how do you use it?
First, let’s shift your mindset. Think of your paper paycheck or direct deposit as a pile of cash. Now imagine that you have a stack of envelopes, each labeled with an upcoming expense.
You put the correct amount of cash in each envelope and spend for that expense from that envelope—when the Dining Out envelope is empty, guess who’s finally going to be eating what they have in the fridge? (It’s you. You’re out of Dining Out money.)
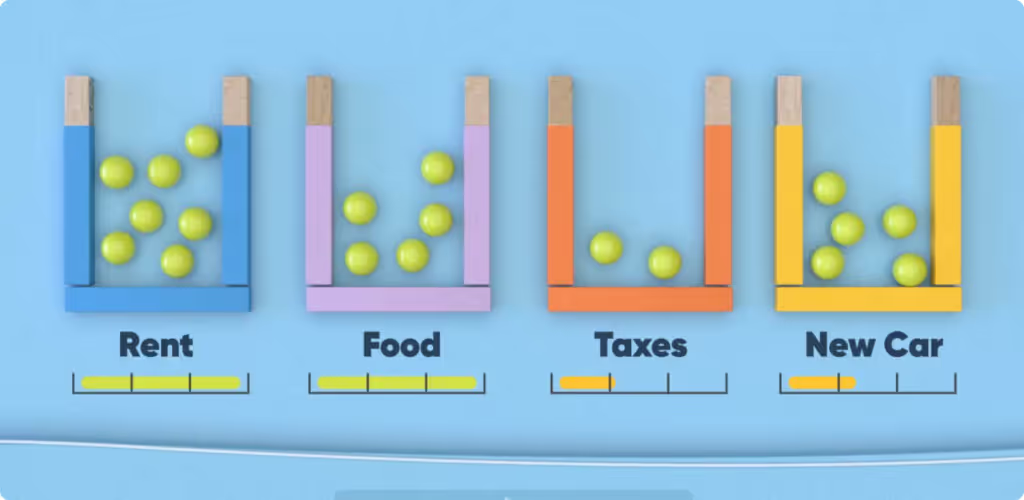
The categories you’ve created in YNAB are your envelopes and the money in your bank accounts is the cash you have to distribute. When you get a new paycheck, all of those shiny, happy dollars are ready to be assigned to an envelope/job. Give those dollars purpose!
Add Your Checking Account
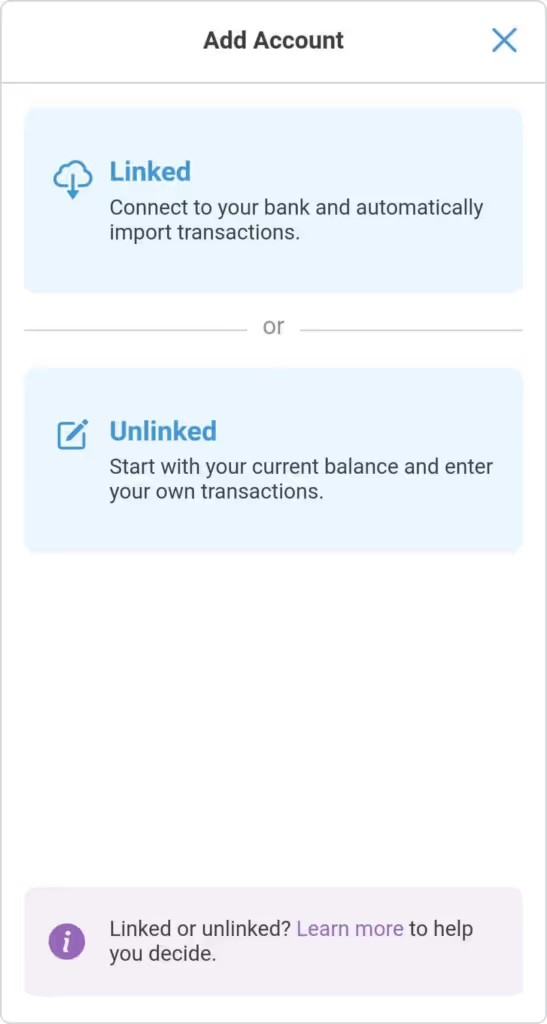
Now you’ve got your categories created, your targets are set up, and you know how to Give Every Dollar a Job. It’s time to see how much money you’re actually working with. Let’s add your bank accounts. You have two options:
- Linked account
If you choose to link your bank account directly to YNAB (don’t worry, you can trust YNAB), all of your balances and transactions will auto-magically connect to your budgeting software using the technology of…lasers. I guess? I don’t know, I still can’t figure out how fax machines worked so let’s just go with lasers for all of it.
- Unlinked account
If you’d rather keep tabs yourself or if your bank doesn’t have lasers, you can go old school and enter your transactions and update your balances manually. Set it up by inputting your cleared balance.
(You can actually enter your transactions manually even if you link your account — YNAB uses…uh, lasers…to identify matching transactions and links them—no duplicates. Entering transactions manually is ideal if you’re just starting YNAB to get the most up-to-date understanding of where your money is at, and an effective way to keep yourself accountable for impulsive spending.)
Assign Dollars on Mobile
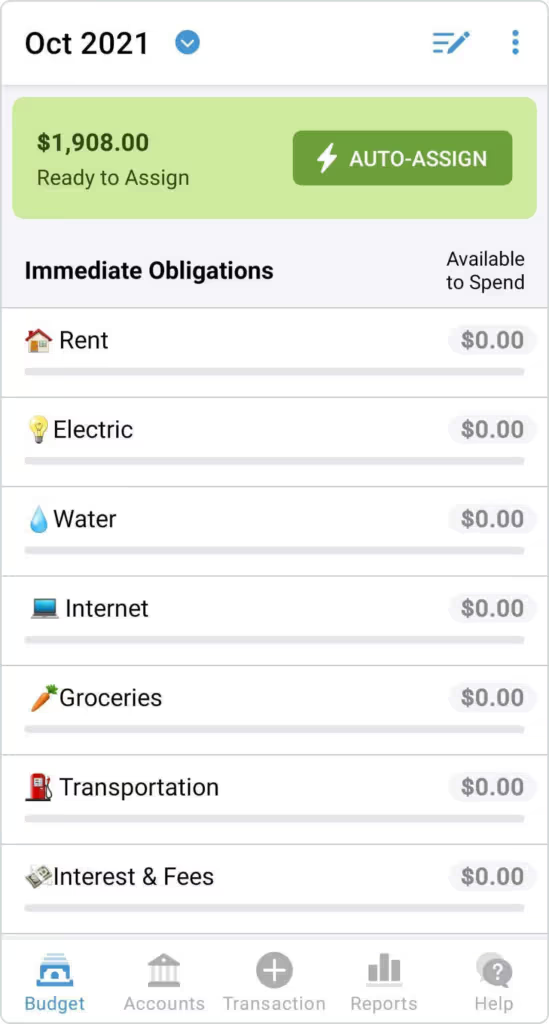
Once you connect your bank account, the amount of money you have to budget with appears in the Ready to Assign section.
Before you start assigning money, ask yourself one important question: What does this money need to do before I get paid again?
If you’re assigning money on the mobile app, you’ll see a lightning bolt button labeled Auto-Assign at the top of the screen. Guess what happens if you hit that button?
That’s right…lasers shoot out. (Just kidding, the dev team said they can’t do lasers. They also said to stop asking.)
Anyway, if you hit Auto-Assign, YNAB looks at your categories and their targets and tries to answer the question of “What does this money need to do before I get paid again?” You take a look at its suggestions and make adjustments as necessary.
For instance, if you need more money to cover your phone bill, maybe you could adjust the money assigned in your Gifts category if there are no gift-giving occasions happening before your next paycheck. Just adjust the amount being assigned to Gifts, that amount will move back to Ready to Assign, and you can assign it to your cell phone bill instead.
Check out our Auto-Assign 101 post for even more information on how all of that works. If you’re afraid of Auto-Assign, that’s fine, just click each category and assign the money yourself. It’s fine. We’re fine.
After tweaking your Auto-Assign suggestions, hit apply and you can see how much money is in the Available to Spend column for each category. This is helpful when you’re at Target and have filled your cart with $100 of home decor items that you may or may not need. Only have $50 left in your home decor category? Put some stuff back. Really. You’ll feel good about it. Maybe not right now, but some day.
Think of your Available to Spend amount as how many dollars you have in each envelope.
Enter a Transaction
Alright, so you’ve made it through the checkout line at Target. You’ve swiped your card and it’s time to update your budget. Easy peasy. Just hit the plus sign at the bottom of the mobile app screen, add Target as the payee, add Home Decor as your category, and enter the amount spent.
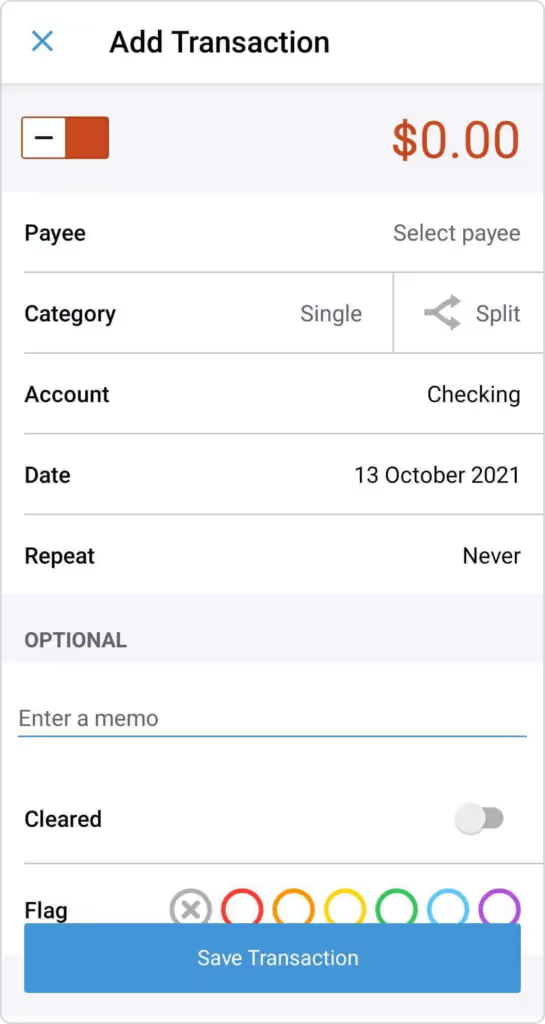
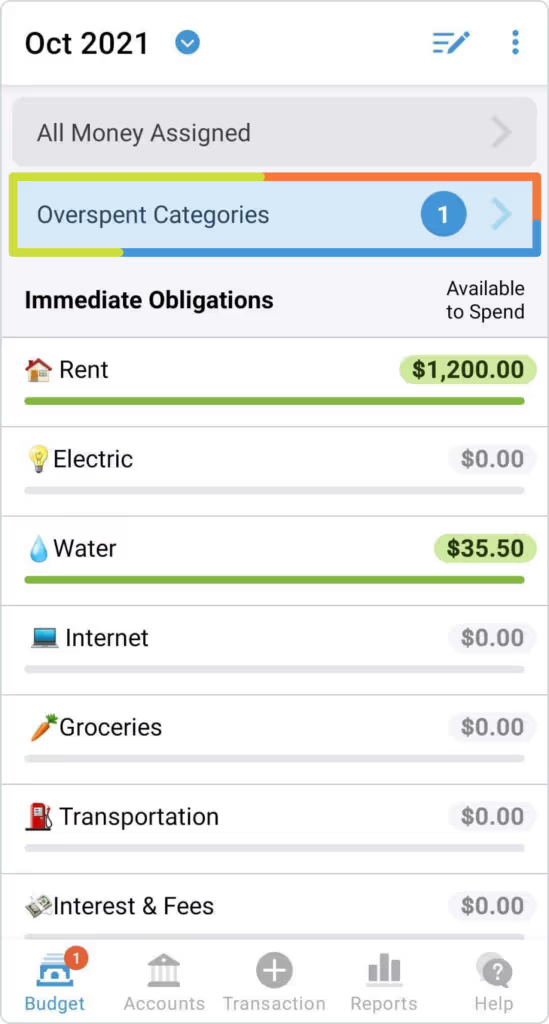
What’s that? You spent $100 on home decor items despite having only $50 in your Home Decor budget? Of course you did. That’s okay. You’ll see that category listed as “overspent” on the home screen of your budget, and you’ll need to move some money from elsewhere to cover that indiscretion. It happens. In fact, it happens so frequently that we have a term for covering overspending—WAM-ing. You know that arcade game where the moles pop up and you bonk them back into their tunnels with an oversized mallet? It’s called whack-a-mole. We do that with expenses. Whack!
Category Color Meanings
The colors in the Available to Spend column are there as visual reminders to keep you on track. Think of it as a traffic light for spending.

- If a category is green, keep cruising—you’ve fulfilled your target and you’re good to go.
- If a category is yellow, that means you need to slow down and pay attention—you have not yet assigned enough money there to fulfill your target, so proceed with caution. That’s not always bad, depending on the target type. You may still have enough money for that week’s needs, without having reached the monthly target yet.
- If a category is red, you need to hit the brakes. If you don’t cover that overspending, the rest of your budget is going to be off until you do.
Deal with Overspending
When you’ve overspent, you have essentially sent some dollars to the wrong job, and have to call in some new dollars to cover their absence. No biggie.
Just scroll to the top of your mobile screen and hit that “Overspent Categories” banner, figure out where you went wrong (it was Target, you know it was) and think about which category matters less right now. Where can you “borrow” some dollars back from to cover your accidental home decor buying binge? Move that money between categories to get back on track.
The Most Important Budgeting Rule
“Well, I’m getting paid again in a week,” you might think as you decide which categories to move money from. “Why can’t I just use that?”
Well, now we are going to give you the recipe to YNAB’s Secret Sauce: only assign the dollars you have right now.
“But, why?” you might ask.
Remember your envelopes? If you used all of the money in your Home Decor envelope, would next week’s paycheck magically appear in there through some kind of osmosis to accommodate you—or would you have to wait until payday?
You know the answer. Don’t make us make you carry around actual envelopes, people.
There are no back to the future dollars, which is a bummer, for sure. But the upside is that by keeping it real, you know exactly how much money you have to spend at any given moment and your budget and your account balance will both be accurate and trustworthy.
You can’t budget dollars that you don’t have. If you go ahead and budget based on what you think you’ll make in a month, you’ve really just created a list of bills. Your budget may say you have enough money to pay the rent, but your bank account balance may not actually include that money yet.
Budgeting dollars you already have provides certainty, clarity, and the confidence that your budget is operating in reality. Only budget as far as your dollars will take you.
Enter a Paycheck and Assign Dollars on the Web
Ah, payday…when the angels slide down from the sky on fluffy clouds singing Hallelujah as they shower you with money. Everyone loves it.
To enter your paycheck on the web, click the account the money is going into (if you have more than one account set up). If your account is linked, hit the Import button and if the check has already cleared, it will just magically show up in YNAB.
If you’re unlinked, you’d hit the Add Transaction button, just like you would to record an expense, but you’d set it as an Inflow (because money is coming into your account, instead of going out—which I like a lot better, personally) and, boom, there’s the money in the Ready to Assign section of your budget page.

You can either hit Assign to automate the process, or move from category to category to assign the money manually by clicking in the Assign section and entering an amount. Looking for a shortcut? You can select a few categories (or an entire category group) and look at the Inspector on the side panel at the Underfunded amount to see how much it would cost to fund all of those categories.
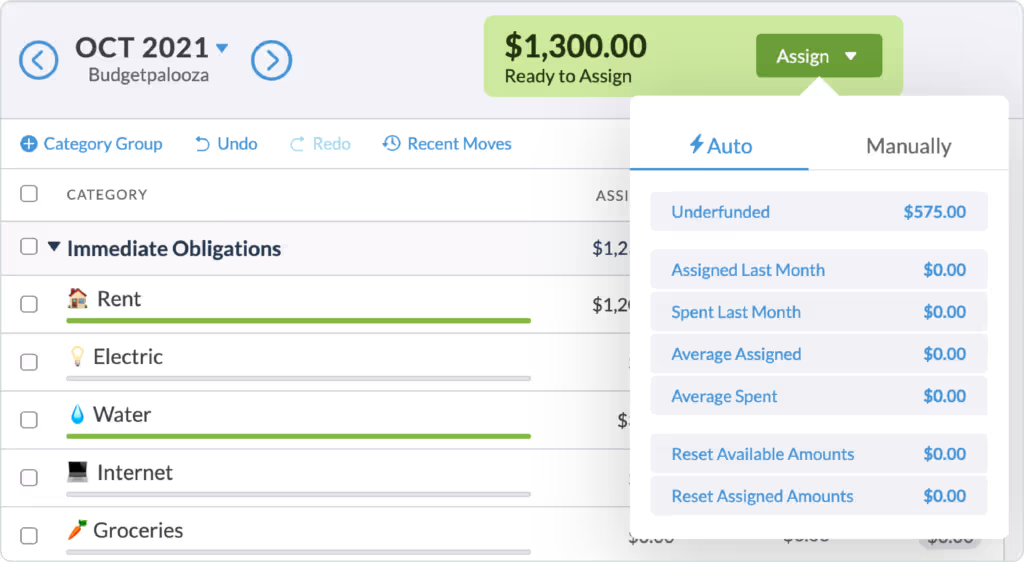
If you find that you’ve already funded this month’s categories, you can call your favorite frenemy and humble brag about it. Wait, no, I meant to say you can go to the top of the screen and move forward to the next month, and assign some money there! Look at you, being all proactive and adulty.
Need a calculator? You can do math equations right inside of the Assigned box. As a writer who feels that math is unnecessary and against her core values (okay, fine, I never learned), this is one of my favorite features and I’m not embarrassed to admit that.
Anyway, there you go. We answered the “What does this money need to do before I get paid again?” question and we Gave Every Dollar a Job. Mission Accomplished.
Add Your Savings Account
Should you put your savings account in YNAB? The answer is yes. But it also means you don’t have to spend those dollars. Here’s how to do it.
Head on over to Add Account, and set it up just like you did with your checking account, but designate it as savings.
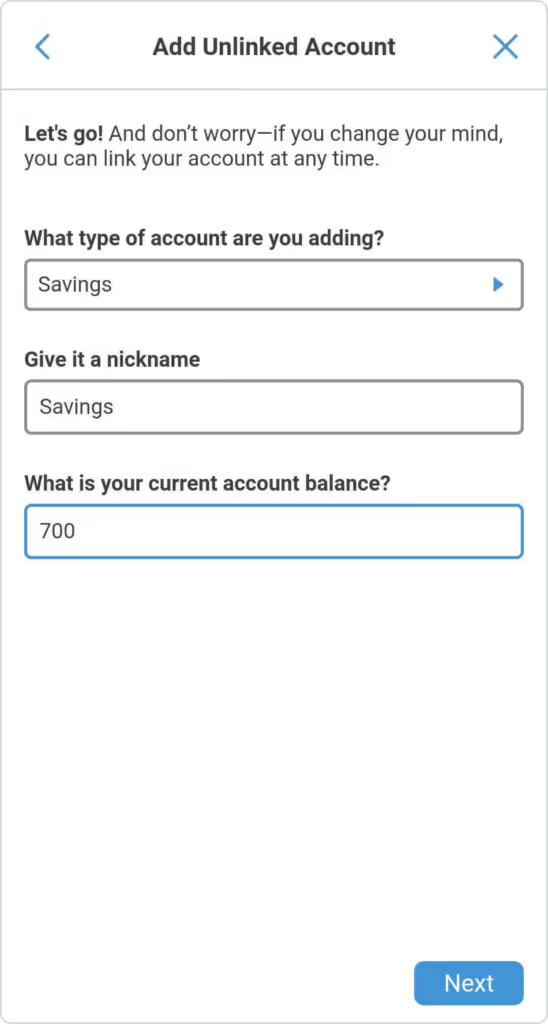
Add your balance and…oops…there it is, in Ready to Assign.
“Okay, but I’m trying not to accidentally blow my savings on Joanna Gaines’ new home decor line at Target,” you might point out.
We know, we know.
Look, you don’t have to hide your savings to protect it from your impulsive side. You just need to get clear on what you’re saving for…and that’s a good idea anyway. Your savings dollars deserve jobs too.
Go ahead and create categories for them—they get their own digital envelopes. Stick some money in your Emergency Fund category, maybe some is earmarked for that vacation you want to take—cool, put those in a Vacation category.
You don’t need several different savings accounts that you try to pretend don’t exist; you need to protect those dollars in their budget categories. Is that nicely-scented candle an emergency? Is it more important than vacation? No and no. You’re less likely to steal money from one of those savings categories when you know those dollars have jobs that are more important.
Trust your budget to protect your savings.
Add Your Credit Card
What? A budgeting company telling me to use credit cards?
Sure, if you want to.
In YNAB, credit cards are treated like debit cards—you won’t be spending money you don’t have. There’s no going into debt and paying fees and interest on new purchases. So, if you want to use a credit card, go ahead and add your account following the same steps as you did for your other bank accounts, just make sure you select Credit Card as the account type.
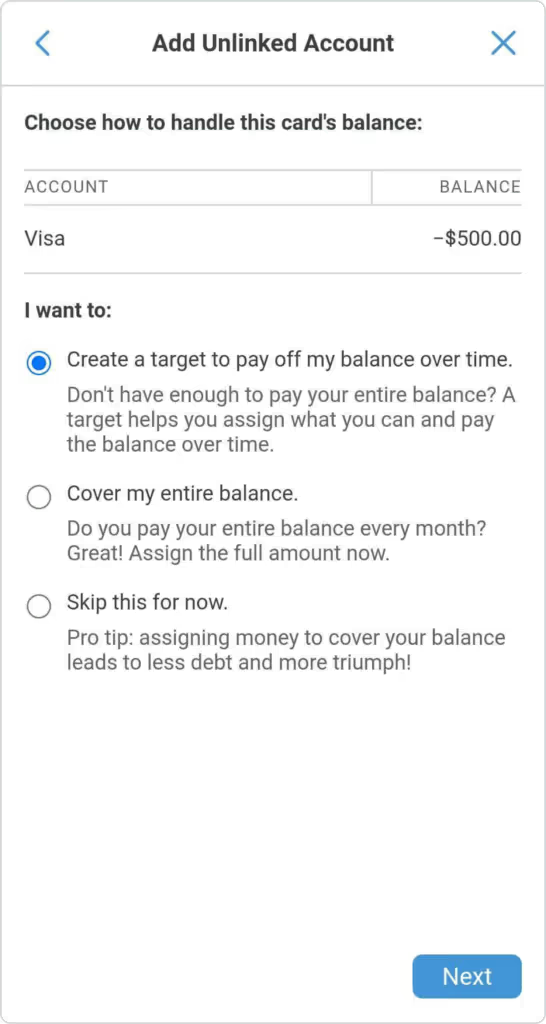
If you have an existing balance, you’ll be asked how you’d like to budget for that balance. Do you want to:
- Create a goal to pay off that balance over time
- Budget for that balance
- Skip this for now
If you select the first option, YNAB will help you calculate how much to set aside each month based on your desired pay-off date and your total balance, not including interest or additional charges. Choose your own budgeting adventure—with help along the way.
In the sidebar with the accounts listed, your balance will show as a negative since you owe that money. In the credit card category associated with that account, the Available amount reflects how much money you have set aside for a payment.
Spend with a Credit Card
YNAB allows you to use a credit card in a way that makes sure you’re not accruing more debt when you make a purchase. You’re still only spending the dollars that you already have. You still need to check your category “envelope” to see if you have enough money for the purchase you’re about to make. Zero dollars in the Dining Out category but a credit limit of $1000? You have zero dollars for dining out. Period.
So, you stop for gas and check to see how much is in that envelope. You have $30. Perfect. You pump $30 worth of gas and pay with your credit card. You enter that transaction, specify that you paid with a credit card, and notice that $30 has been subtracted from your Gas category and $30 has automatically been added to the amount available for that credit card payment.

YNAB basically took the money out of your Gas envelope and moved it into your Credit Card Payment envelope. When you go to make your payment, you’ll have already set aside all of the money needed to cover those purchases. This is how YNAB keeps you from getting into more debt.
Make a Credit Card Payment
In a perfect, debt-free world, all of the money you spent on a credit card that month would be patiently waiting to be sent to the credit card company as a payment. But if you have a balance, you’ll have to deal with that too.
In that case, the Available amount will show as yellow—caution—because you have not yet fulfilled the plan to pay the entire amount off. In order to do that, you’ll have to reach your target amount by moving some money around between categories or from Ready to Assign when you get paid. Add that extra money to the Assigned section of your credit card category to get back in the green.
To summarize, the money in the Available column of your credit card categories has been automatically pulled from categories to serve as the payment for those purchases. Any amount in the Assigned column is money that you put there to cover part of an existing balance.
When you make the payment, go to that credit card account listed in the sidebar and hit the Record Payment button. Set the Payee to reflect which bank account the funds are coming from (Payee: Payment from Checking), YNAB will automatically add whatever is in your payment category into the Inflow, and when you hit save, you’ll see your updated balance in the account sidebar.

So not only do you avoid getting into more debt, it’s also easier to stay motivated to pay down existing debt.
The Three Step Method
Simplify this by remembering these three steps whenever you get a paycheck:
- Step one: Enter your income. Whenever you get new money, put it in YNAB.
- Step two: Assign your dollars. Let your priorities guide you. Remember, “What does this money need to do before more money arrives?”
- Step three: Follow your plan. Track your spending as you go and make changes where you need to. Feel free to adjust your plan to fit your circumstances.
Keep following those three steps, keep following your budget, and you’ll pay off debt, save more money, and build wealth. And perhaps best of all, you’re totally in control of your money.
Need a Little Help to Set Up Your Budget in YNAB?
If you ever run into a problem, we’ve got you covered. Just hit the little question mark icon on the bottom right hand side of your screen and search our library of resources. If you need one-on-one help, send a message to our support team—they’re YNAB wizards and they love to problem-solve. They’re also super nice, so don’t be shy about reaching out if you need to know more about how to set up your budget in YNAB.
You can also check out our Help Center for more resources, including podcasts, videos, live Q&A sessions, guides, blog posts and more!
Our goal is to help you take total control of your money, and the first step of that is making a budget. You’re well on your way!

.svg)
.png)


